SSM框架搭建-上
在谈SSM框架的搭建之前,聊一聊这个项目的特点之一: 分布式架构
架构以及传统的“集群架构”和“分布式架构”的区别
单机架构
讲集群架构之前,要先提一下单机架构。例如一个简单的web项目,这个项目被部署在一个服务器上,这样的架构模式就是单机架构。显而易见:单个服务器能够处理能力是有限的,当这个项目不断添加新的业务处里,访问量不断增加时,单机往往无法负荷,最常见的就是访问某个网站时页面显示过慢(没错!同志!有时候打开一个网页打开半天其实不是你网速不行)
集群架构
单个服务器应付不过来,那就多来几个。将原来部署在单机的项目复制几份,分别部署在其他服务器上,构成一个“群”,一个服务器就是这个集群上的一个节点,每个节点处理同样的业务。当有客户访问服务器时,“负载均衡服务器”就会将客户引导向集群中负载较小的节点,以此提供给客户最好的访问体验。
我个人都集群架构解决单机架构问题的方式,称之为“暴力破解”。
- 优点:解决单个服务器业务过多访问量过大时出现安全问题
- 缺点:耦合度高;增加了运维成本;不能灵活部署。
分布式架构
例如一个web电商项目,其业务类型一点是多样的,“用户服务”、“商品服务”、“后台管理服务”等。分布式架构,即将一个完整的系统拆分成多个子系统(子项目),分布在不同的服务器中,这一个个服务都是一个个独立的项目,可以独立运行。服务之间又存有依赖,数据流通。
- 优点:模块独立,耦合度低;独立运维;灵活部署
- 缺点:需要额外开发模块间的数据通讯
显然将分布式架构应用在一个会被大量用户的访问的WEB项目是再好不过的选择。
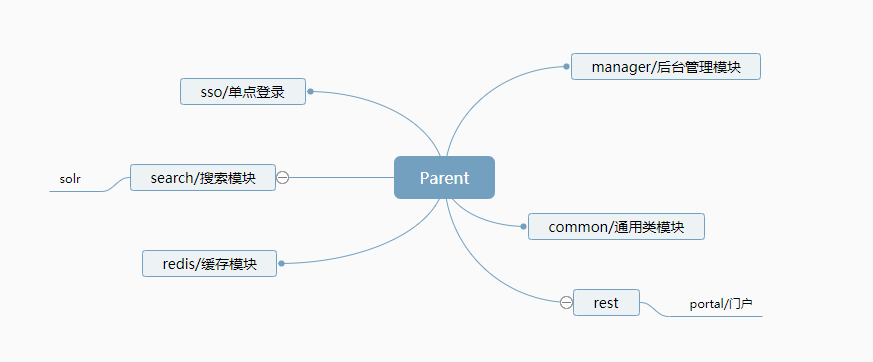
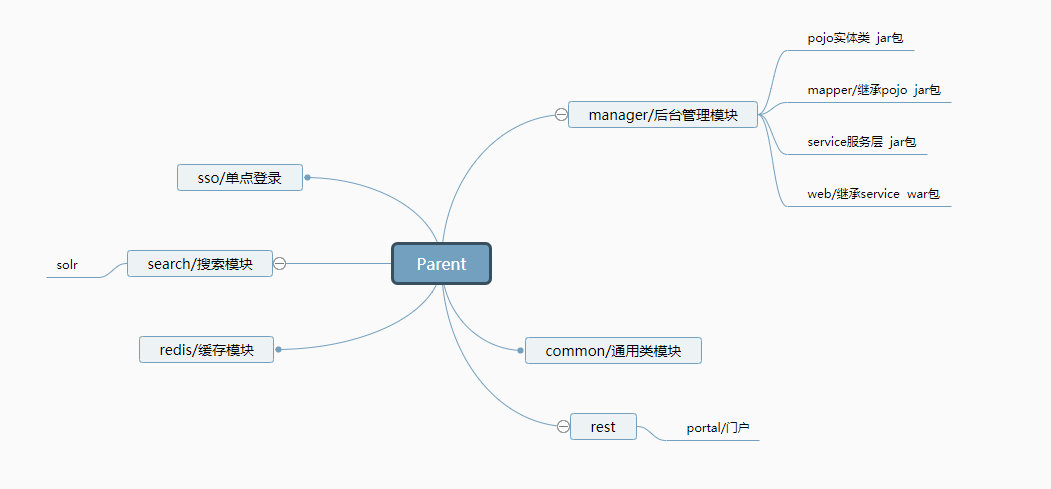
SSM项目分布式架构模块设计
SSM框架搭建
框架的搭建将用到Maven工具
什么是Maven
一个项目管理工具,提供了一套完整的构建生命周期的框架,亦可以是一个整合工具。它包含了一个项目对象模型 (POM:Project Object Model),一组标准集合,一个项目生命周期(Project Lifecycle),一个依赖管理系统(Dependency Management System),和用来运行定义在生命周期阶段(phase)中插件(plugin)目标(goal)的逻辑。
简单来说,就是可以自动完成一些工程的基础构建配置
例如:
- jar包的导入。我们需要确定只有jar包的依赖关系、版本、类型。
- 快速、集中编译
- 过程中单元测试
- 自动整合项目
一句话:Maven主要做编译、测试、报告、打包、部署等操作完成项目的构建。
Maven的特性
依赖管理
- jar包的依赖
- 工程间的依赖
- 继承
- 聚合
工程类型
- war包项目
- jar包项目
- pom工程
Maven的安装
- 首先要配置好JDK的环境变量
- 从官网下载
- 配置Maven环境变量
修改配置文件
添加阿里云镜像路径
Maven文件夹/conf文件夹/settings.xml
在mirrors标签之间添加:
1 | <mirror> |
配置本地仓库
Maven文件夹/conf文件夹/settings.xml
1 | <localRepository>D:/MavenRepository</localRepository> |
用IDEA创建Maven项目
过程不赘述
SSM框架整合 — 在Manager模块实现后端管理系统
基本思路
- spring → service
- spring MVC → 表现层
- Mybatis → dao 数据库
过程中我们要用到的数据库操作框架有Mybatis和druid连接池。
什么是Mybatis?
MyBatis 是一款优秀的持久层框架,它支持定制化 SQL、存储过程以及高级映射。MyBatis 避免了几乎所有的 JDBC 代码和手动设置参数以及获取结果集。MyBatis 可以使用简单的 XML 或注解来配置和映射原生类型、接口和 Java 的 POJO(Plain Old Java Objects,普通老式 Java 对象)为数据库中的记录。
什么是druid连接池
Druid是Java语言中最好的数据库连接池。Druid能够提供强大的监控和扩展功能。
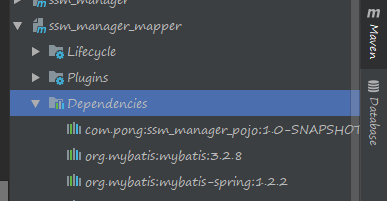
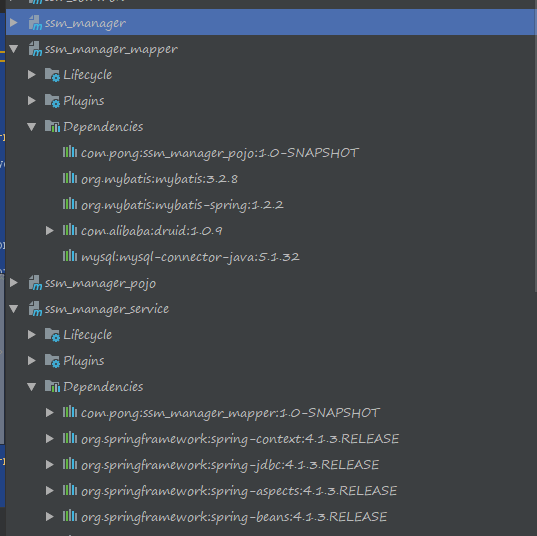
引入Mybatis
Parent模块的pom.xml中配置Mybatis依赖。
在Manager模块的mapper包中的pom.xml配置一致的Mybatis依赖
在Manager模块/web包/src/mian/resource → 创建mybatis文件夹并配置sqlMapConfig.xml文件 用于构建 SqlSessionFactory
1 |
|
上面为sqlMapConfig.xml文件内容,注释内容可删除,因为将通过Spring来调用
引入完成后Maven依赖情况
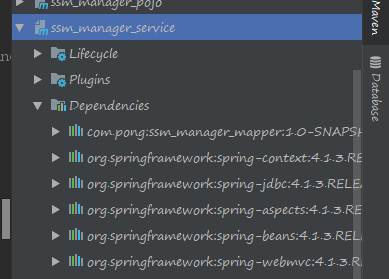
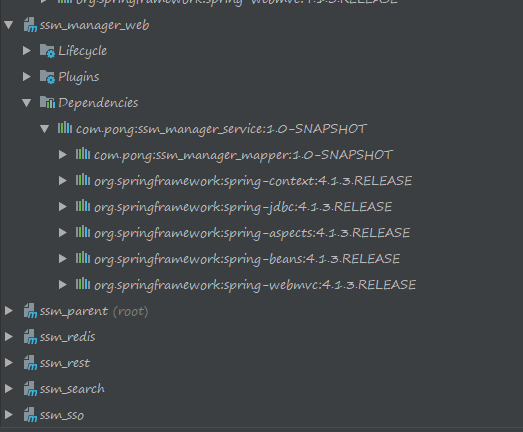
引入Spring
在Parent中的pom.xml中和manager模块的service包的pom.xml中配置以下依赖:
- spring-context
- spring-jdbc
- spring-aspects
- spring-beans
- spring-webmvc
在manager模块/web包/src/mian/resource → 创建spring文件夹并配置springmvc.xml文件
1
2
3
4
5
6
7
8
9
10
11
12
13
14
15
16
17
18<beans xmlns="http://www.springframework.org/schema/beans"
xmlns:xsi="http://www.w3.org/2001/XMLSchema-instance"
xmlns:util="http://www.springframework.org/schema/util"
xmlns:context="http://www.springframework.org/schema/context"
xmlns:mvc="http://www.springframework.org/schema/mvc" xsi:schemaLocation="http://www.springframework.org/schema/context
http://www.springframework.org/schema/context/spring-context-4.2.xsd
http://www.springframework.org/schema/beans http://www.springframework.org/schema/beans/spring-beans.xsd
http://www.springframework.org/schema/util http://www.springframework.org/schema/util/spring-util.xsd http://www.springframework.org/schema/mvc http://www.springframework.org/schema/mvc/spring-mvc.xsd">
<context:component-scan base-package="com.pong.controller">
</context:component-scan>
<mvc:annotation-driven></mvc:annotation-driven>
<bean class="org.springframework.web.servlet.view.InternalResourceViewResolver">
<property name="prefix" value="/WEB-INF/jsp/"/>
<property name="suffix" value=".jsp"/>
</bean>
</beans>
引入完成后Maven依赖情况
引入druid连接池
在Parent中的pom.xml中和manager模块中的mapper包的pom.xml中配置druid依赖
在manager模块/web包/src/mian/resource/spring 创建以下文件:
- applicationContext-dao.xml
- applicationContext-trans.xml
- applicationContext-service.xml
applicationContext-dao.xml
的配置信息可以在druid的中文使用文档中的druid参考配置找到:
https://github.com/alibaba/druid/wiki/%E5%B8%B8%E8%A7%81%E9%97%AE%E9%A2%98
1 |
|
!!:额外在manager模块/web包/src/mian/resource/ 创建一个perproties文件夹并配置一个db.perproties文件
db.perproties
1 | jdbc_url = |
applicationContext-service.xml
1 | <beans xmlns="http://www.springframework.org/schema/beans" |
applicationContext-trans.xml
1 | <beans xmlns="http://www.springframework.org/schema/beans" |
引入MySQL
在Parent中的pom.xml中和manager模块的mapper包的pom.xml配置MySQL依赖
用SQLyog工具在创建数据库和一个测试用表
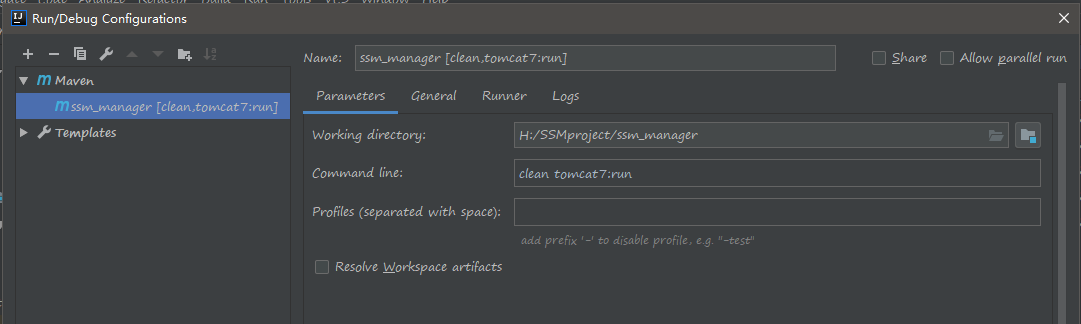
引入Tomcat
在manager的pom.xml配置tomcat7-maven-plugin插件
测试准备
在web包的webapp文件夹(没有的话创建一个)中创建WEB-INF文件夹,通过idea生成web.xml,并作如下配置
1
2
3
4
5
6
7
8
9
10
11
12
13
14
15
16
17
18
19
20
21
22
23
24
25
26
27
28
29
30
31
32
33
34
35
36
37
38
39
40
41
42
43
44
45
46
47
48
49
50
51
52
53
54
55
56
57
<web-app xmlns="http://xmlns.jcp.org/xml/ns/javaee"
xmlns:xsi="http://www.w3.org/2001/XMLSchema-instance"
xsi:schemaLocation="http://xmlns.jcp.org/xml/ns/javaee http://xmlns.jcp.org/xml/ns/javaee/web-app_4_0.xsd"
version="4.0">
<display-name>pong-manager</display-name>
<welcome-file-list>
<welcome-file>index.html</welcome-file>
<welcome-file>index.html</welcome-file>
<welcome-file>index.jsp</welcome-file>
</welcome-file-list>
<!--加载spring容器-->
<context-param>
<param-name>contextConfigLocation</param-name>
<param-value>classpath:spring/applicationContext-*.xml</param-value>
</context-param>
<listener>
<listener-class>org.springframework.web.context.ContextLoaderListener</listener-class>
</listener>
<!--解决post乱码-->
<filter>
<filter-name>CharacterEncodingFilter</filter-name>
<filter-class>org.springframework.web.filter.CharacterEncodingFilter</filter-class>
<init-param>
<param-name>encoding</param-name>
<param-value>utf-8</param-value>
</init-param>
</filter>
<filter-mapping>
<filter-name>CharacterEncodingFilter</filter-name>
<url-pattern>/*</url-pattern>
</filter-mapping>
<!--springmvc的前端控制器-->
<servlet>
<servlet-name>pong-manager</servlet-name>
<servlet-class>org.springframework.web.servlet.DispatcherServlet</servlet-class>
<init-param>
<param-name>contextConfigLocation</param-name>
<param-value>classpath:spring/springmvc.xml</param-value>
</init-param>
<load-on-startup>1</load-on-startup>
</servlet>
<servlet-mapping>
<servlet-name>pong-manager</servlet-name>
<url-pattern>/</url-pattern>
</servlet-mapping>
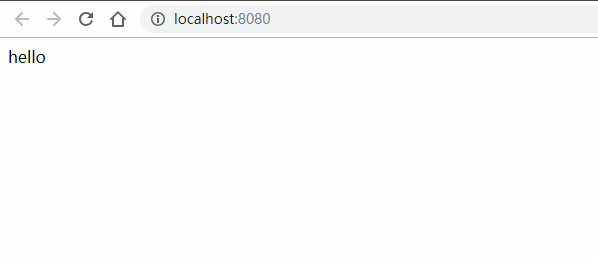
</web-app>在webapp文件夹创建一个简单的jsp文件
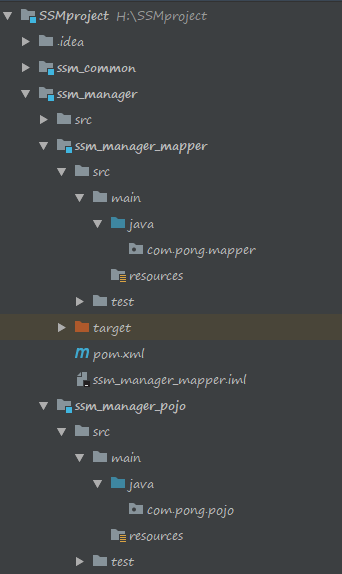
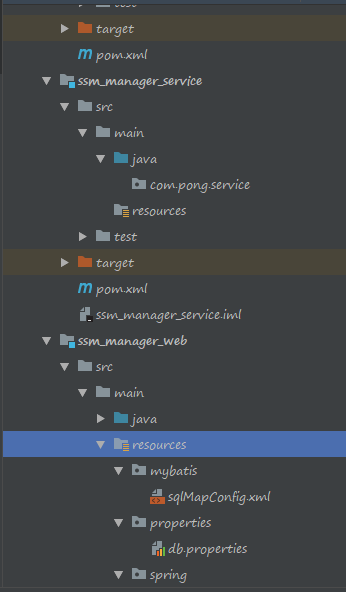
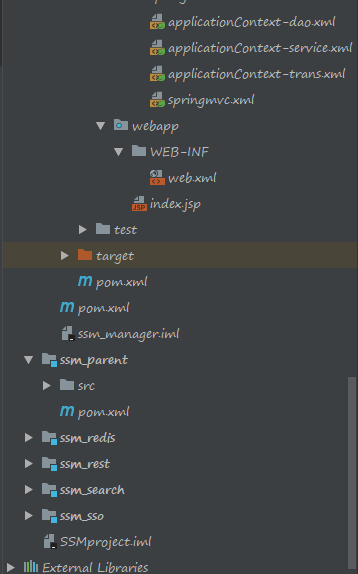
所有工作基本完成,文件夹情况和Maven依赖情况如下
测试